Proface HMI and PLC Delta DVP Communication Use RS485 Modbus

How to communicate Proface HMI To PLC Delta DVP Series? This post guides you: “Communication in between Pro-face HMI and PLC Delta DVP Series (CPU 16ES2)”.
Preparing To Communication Proface HMI And PLC Delta DVP Series
On GP-Pro EX 4.09 when you create a new project and add a “Device/PLC” for connecting to HMI, you do not see the “Delta DVP Series” for selection. We will use Modbus-IDA to connect a Delta PLC and Pro-face HMI uses RS485 – 2 wires.
To communicate Proface HMI and PLC Delta DVP Series we used:
- Proface hmi and plc delta communication – Hardware:
- Delta PLC Model DVP16ES2
- Pro-face HMI GP4000 Series Model GP4402WW.
- COM RS485 9 pins (Female), terminal resistance (100 ohms, 1/2W) for communication cable
- Software for connecting proface hmi and plc delta
- Delta WPLSoft 2.5 for PLC programming
- GP-Pro EX 4.09 for Pro-face HMI programming
Select The Connection Method Delta PLC And Pro-face HMI
- We used RS485 2 wires Type for connection Pro-face HMI and PLC Delta
- On Pro-face HMI, we used COM 2 with interface RS485 for connection
- On DVP PLC, we used COM 2 with D+ and D- terminals for connection
- Diagram of the connection Delta PLC and Pro-face HMI
Could be helpful for you:
- Download HMI Program Using USB Disk On Delta DOPSoft V4.00
- Delta PLC Connect WinCC TIA Portal Through KEPServerEX 6
- Download, Upload Program HMI Pro-face Use USB Disk On GP-Pro EX
Communication Delta PLC To Proface HMI On The Software
On Delta DVP PLC Software – WPLSoft 2.5
- Open WPLSoft and then create a project with a Delta DVP PLC device.
- Click “Options” -> “Communication Settings” and set the communication parameters: Data Length; Parity; Stop Bits; Baud Rate and Station Address.
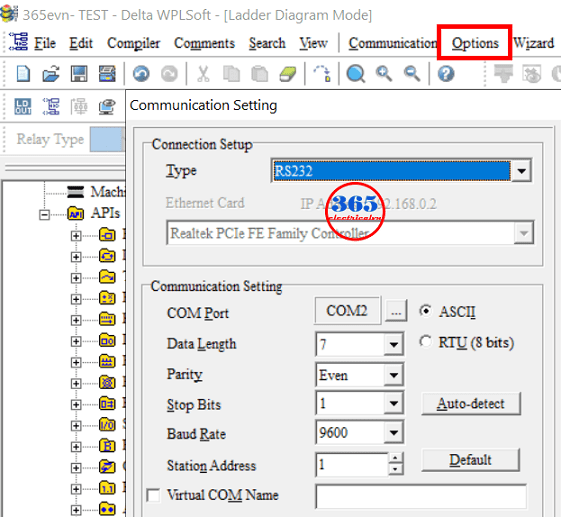
Compile and download the project to PLC. If you are a newbie, please refer to how to download the PLC program on WPLSoft in the previous post on 365EVN, which we guided (Via cable or via USB Flash drive and HMI).
On Pro-face HMI Software – GP-Pro EX 4.09
Follow carefully the steps to communication Proface HMI and PLC Delta DVP Series:
- Open GP-Pro EX 4.09 and create the project with a Pro-face device.
- On the “Device/PLC” step, select:
- Manufacturer: Modbus-IDA
- Series: General MODBUS SIO Master
- Port: COM 2
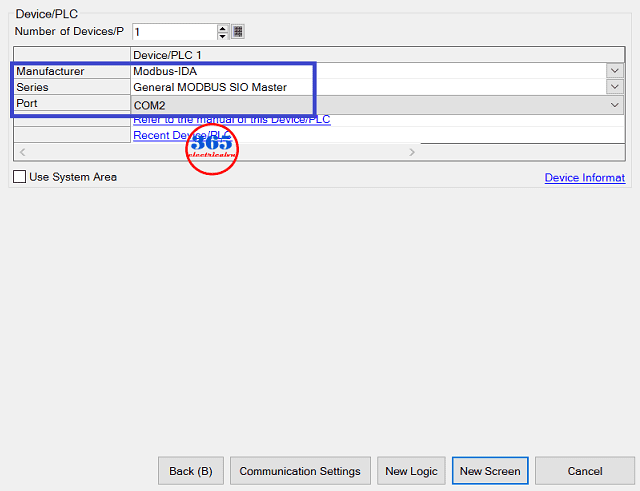 Click on “New Screen” and open the project. Then “Save” the project to your PC.
- On the menu click “Project” -> “System Settings” -> “Device/PLC” and set the parameter of the communication between Delta PLC and Pro-face HMI.
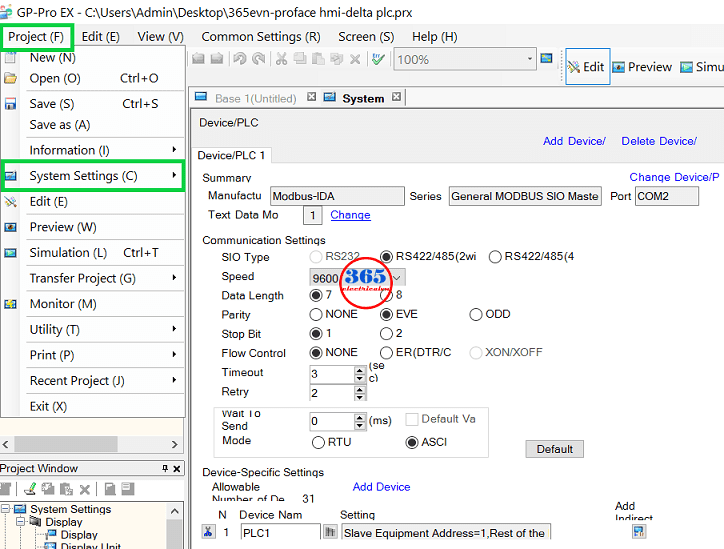 Back to the edit screen, and create the objects (button, switch, input/output number…).
- Enter the address for the objects, please download and refer to the “Modbus address table of Delta DVP series PLC“. For example, in PLC we used the word D200 -> on GP-Pro EX 4.09 we must enter “404297” to address. Or in PLC we used an output Y0 -> on Pro-face HMI we must enter “001281” to address.
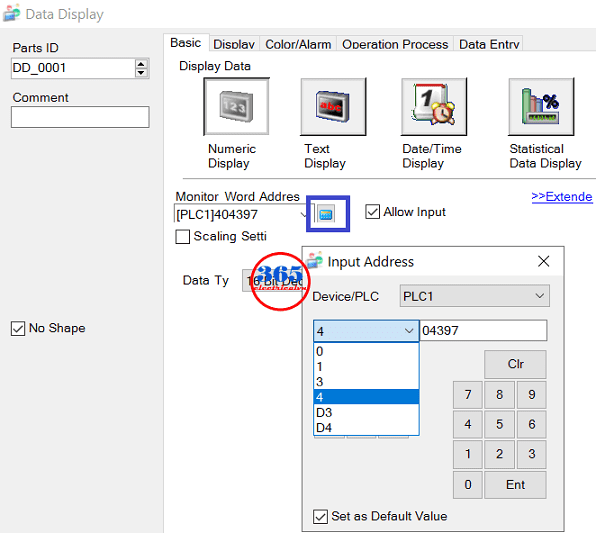 Check the error of the project and download the project to Proface HMI. With Pro-face HMI you can download the program via Ethernet, via USB Cable or via USB flash drive. You can refer to the previous post to do it.
Finally, make the cable follow the above connection diagram. Connect, and check the connection Delta PLC to Pro-face HMI by try change some values on Pro-face HMI and check on Delta PLC or vice versa.
Guide Video for communication proface hmi and plc delta
If you can not watch the video above, please check another link in my Video Area (V0115) or give feedback to me via WhatsApp, Email, or Message. Thank you!
Link Download
- Modbus address table of Delta DVP series PLC: Link
- DOPSoft V4.00: Delta DOPSoft V4.00 – HMI Soft for DOP-100 Series – Download & Setup
- Link: Project file source (PLC, HMI)
If you have any questions about connecting Proface HMI and PLC Delta, please comment below or contact us via Facebook. See you in the next posts!
– 365evn Automation Training –
If you find this content valuable, please rate it (click the button above), share it with your friends or invite me for a coffee by clicking the button below.


