Control Delta Servo Position With S7-1200 PLC and HMI – Full Tutorial
Full tutorial control Delta servo position with S7-1200 PLC and HMI. An article in the series Delta Servo Training on 365evn Automation blog.
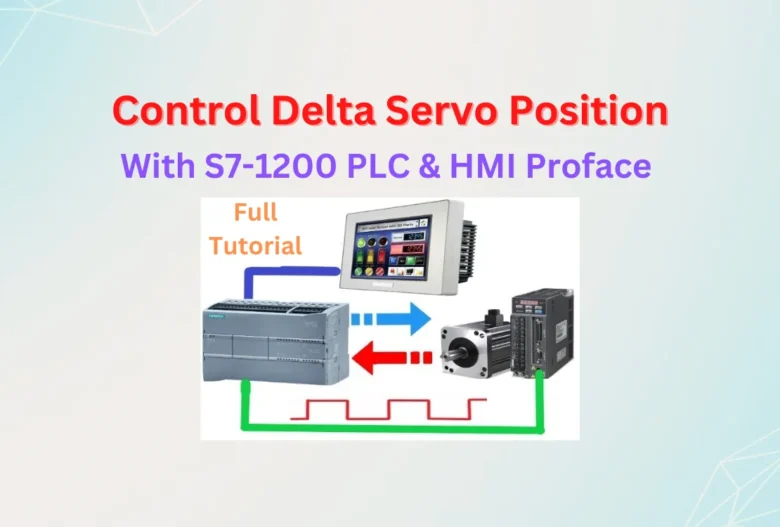
Hi friends. Today, 365evn fully guides you to control Delta servo position with S7-1200 PLC and HMI Proface. The article in the series “Automation Training” – Delta Servo Training on 365evn Automation blog. It is helpful when you need to control the servo position in your application.
Control Delta Servo Position With S7-1200 PLC and HMI Proface
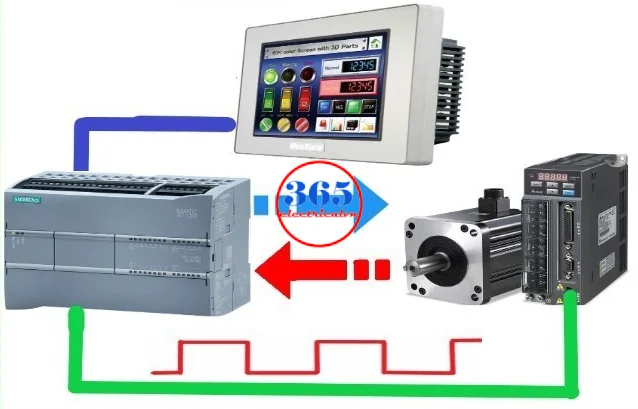
In this article of the “Delta servo training” series on my blog, I used the software and hardware below:
- Hardware
- PLC Siemens S7-1200 CPU 1214C DC/DC/DC
- Delta Servo Motor and Delta Servo Drive ASDA B2 Series
- Proface HMI GP-4402WW (option – you can use another HMI or not)
- Connection cables (servo motor to drive, PLC to HMI, PC to devices…)
- Software
- Siemens TIA Portal – PLC programming software
- GP Pro EX V4.09 SP2 – HMI Programming software
- Delta ASDA Soft V4.08 – Servo software
- ASDA B2 Servo User Manual
You can download all the above software free at the end of the article. However, to learn this tutorial of the “Automation Training” series you need some basics about S7-1200 PLC programming (download, upload program…), you can refer to it on my blog: “S7-1200 Getting Started“, HMI programming, Basic Servo… You can refer to all via the article or video on my blog. Of course, if you have any questions feel free to contact me via Chat/Email/WhatsApp.
The Steps to Control ASDA-B2 Servo Position
Step 1 – Hardware connection
Before controlling the position of the Delta servo motor, we need to connect all the cables for the motor, drive, PLC and HMI.
1 – Connect Delta Servo Motor and Drive
We will connect the servo drive to the servo motor using the power cable and encoder cable. Therefore, please refer to some articles below on my blog to do that.
- Delta Servo Drive Wiring, Jog run on ASDA-B2 – Fast guide
- Delta Servo Factory Reset – 3 Easy Steps
- Delta Servo Drive Alarm on ASDA B2 – How To Clear
2 – Connect Delta Servo Drive to PLC S7-1200 using CN1 cable
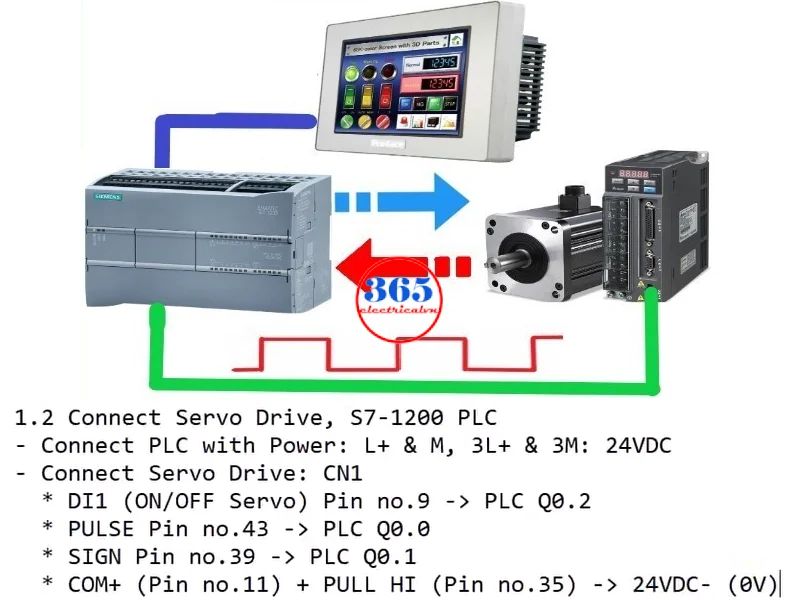
Firstly, connect the PLC S7-1200 to the power supply, then connect it to the servo drive through the CN1 cable. We connect all as below. You can refer to the video to wiring it to control Delta servo position.
If you can not watch the video above, please check another link in my Video Area (SV0002) or give feedback to me via WhatsApp, Email, or Message. Thank you!
3 – Communication S7-1200 PLC and HMI Proface via Ethernet cable
We connect PLC S7-1200 to Proface HMI through an Ethernet cable. Refer to the below video to do that.
If you can not watch the video above, please check another link in my Video Area (V0047) or give feedback to me via WhatsApp, Email, or Message. Thank you!
Step 2 – Setting the parameter on the Delta servo drive
We control Delta Servo Position via PLC by using the “Position Mode”. As you know, the servo position mode is used in precise positioning applications, such as industrial machinery. With this mode on the ASDA B2 servo, the directional command pulse input can control the rotation angle of the motor with external pulses (Ex: from PLC). In the position closed-loop system, speed mode is mainly used with the gain type position controller and forward compensation added externally.
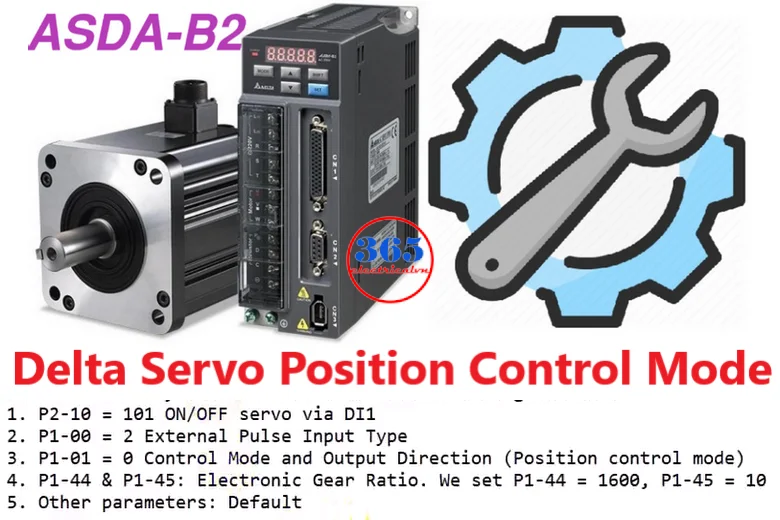
We need to set the Delta servo drive parameters as below. However, we can set it through the keyboard on the panel display or ASDA Soft with a servo programming cable.
If you can not watch the video above, please check another link in my Video Area (SV0003) or give feedback to me via WhatsApp, Email, or Message. Thank you!
Step 3 – Control Delta Servo Position With S7-1200 – PLC Programming
In this step, we create a new project on the TIA Portal and program it using the “Technology objects” -> “Motion Control” features.
- Open the TIA portal and add a new project for your PLC model.
- Then, click “Technology objects” -> “Motion Control” -> “TO_Positioning Axis”
- Config the parameter for the above axis
- And, program the S7-1200 PLC to control Delta servo position using the command “MC_Power”, “MC_JOG”, “MC_ MoveAbsoute”, “MC_MoveRelative”…
- For details on this step, please refer to the below videos
If you can not watch the video above, please check another link in my Video Area (SV0004, SV0005) or give feedback to me via WhatsApp, Email, or Message. Thank you!
Step 4 – Proface HMI Programming (option)
In this step, we program the proface HMI on GP ProEX V4.09 SP2 software. On the HMI we can control Delta servo Position by entering the values from the touch panel or running JOG the Delta servo by buttons. However, you can run or control Delta servo from the PLC program on the TIA portal by using the online mode.
- Create a new project and set the parameters for communication Proface HMI and PLC S7-1200.
- Then, add the objects to the HMI screen (button, number input, label…)
- Add the tags from the PLC program to the Proface HMI program
- Compile and download it to HMI. You can refer to some ways I guided you on my blog: USB cable, Ethernet or USB disk.
Details of this step please watch and follow the video below
If you can not watch the video above, please check another link in my Video Area (SV0006) or give feedback to me via WhatsApp, Email, or Message. Thank you!
Step 5 – Test Control Delta Servo Position from HMI
- Connect all and supply the power
- Check all functions on your HMI
If you can not watch the video above, please check another link in my Video Area (SV0001) or give feedback to me via WhatsApp, Email, or Message. Thank you!
Full Tutorial Control ASDA-B2 Servo Position With PLC S7-1200 and Proface HMI
All contents of the steps (step 1 – step 5) are in the video below.
If you can not watch the video above, please check another link in my Servo Training Video (SV0036) or give feedback to me via WhatsApp, Email, or Message. Thank you!
Software Download
- TIA Portal V15.1 to V19 Download
- ASDA Soft All versions Download
- Delta ASDA-B2 Servo User Manual Link
If you find this content valuable, please rate it (click the button above), share it with your friends or invite me for a coffee by clicking the button below.


